Next Up: Headlights!!!! Woot Woot! Bake these bad boys for 10 minutes at 220˚ – Shazam! They open right up. Do not attempt with OEM Chrysler headlights, the adhesive is heat resistant and needs to be cut open. Some aftermarket headlights may change the bulb socket, so be aware of that. Mine are EagleEyes brand, and they now use an H8/H9/H11 bulb, instead of the Dart’s 9012 socket.


OEM Silver Headlights:

Painted the silver portion of the headlights gloss back, and also used the 2k Glamour Clear Coat. The pic also shows the demon eyes (partially) installed. I used a dremel to cut away enough of the headlight to fit the halo in, as I also used a diffuser, so you don’t see the naked LED strips.


I’ve got a lot of mods to do, if I want my build thread as long as @viperman96 … Lol. That being said, this project started as a simple repair. Last year, I installed my FMIC, and has been working great. A few weeks ago, I was taking a friend home after the Guns N’ Roses concert (BAD ASS, btw!) and on the way home, I heard a “pop.” I’m not sure what was up, but I was pretty sure something blew off. Sure enough, upon further inspection, my pipe blew off the driver’s side of the FMIC. DAMN!
I put her up on the Yoderian ramps, and had a look. I tried every form of yoga, stretching, contortion, and hypnosis, but I could not reach up into the area to fix it. At that point, I said screw it, and pulled the fascia off. I wasn’t ready to do the headlights, and other wiring I had been putting off, but at this point, I didn’t want to keep pulling it off. Once I got in there, I realized the hood latch bolts had come loose, and the FMIC fell forward just enough to pull it loose. I re-bolted it and used toothed lock-washers. That thing will never come out, again.
Here are some pics of the wire mess before I cleaned everything up. I went through an soldered, crimped and waterproofed every single connection. I also soldered on loop fasteners to all of the ground points. I even sanded down a few areas to make more solid ground connections. This proved to be totally worth it, as the cheap HIDs that used to flicker (just a tad) were now completely solid. Perhaps this is the only case of flawless, non-canbus lights, that I have seen, although it’s taken me a bit to finally get them perfect.
soldering the connections:
adding loop fasteners to the ground points:
Moved the (hot) resisters to below the intake and fascia, routed wires to the underbody lights:

OMG – what a mess!
re-routed all of the wires under the fuse box (had to remove it):
added tie wraps (replaced them with black, later):
tie wraps (again, I could see the yellow through my grille, so I swapped them with black (doh!):
Almost back together:
Since I swapped out the battery for an Optima, it gave me the chance to put all of the auxiliary power on the side terminals, leaving only critical engine components on the top terminals. I may add a dry cell battery for car shows, as well.
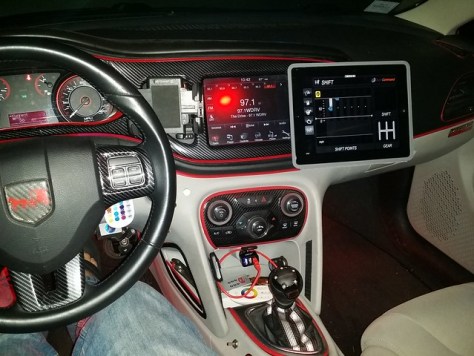
After the front end was re-assembled, I put all of the control boxes along the passenger side under the hood. There is a ledge with plenty of space – All of the boxes got adhesive promotor and 3m adhesive. They are all RF controlled, and when the hood is open, I can read what mode / setting they are in, and adjust accordingly, if needed. This now includes the Starry Night Halos (https://www.starrynighthalos.com/ or Herculeds. The most powerful name in LED lighting.) Demon Eyes* and Yoderian Magical Underbody Lights.
[IMG] Angel Eyes, also known as “halos,” are accessory lights that are installed or integrated into a vehicle’s headlight assembly, to encircle the low or high beam headlight. They do not replace the headlight or any other lights, they are simply accessory lights, for cosmetic purposes, or to be used as a DRL.[/IMG]
These are the wires coming out of the headlights. All of the connections were waterproofed, as well, which I highly recommend. The Starry Night Halos DO NOT come with enough cable length to mount in a logical position, which was really annoying. I had to solder extensions on them.

Here is the headlight assembled. You can see the halo diffuser in this pic with the lights off.


Here are all of the interior switches – the four colored switches are for interior and exterior lights. The smaller, metal switches are Grille/Underbody Lights, SN Halos, and Demon Eyes, respectively.


I would also like to point out to the next guy trying this – the Dragon Laminates (Dragon Eyes) baked in the oven @ 220˚ for 10 minutes with no issues, whatsoever.
*Angel Eyes, also known as “halos,” are accessory lights that are installed or integrated into a vehicle’s headlight assembly, to encircle the low or high beam headlight. They do not replace the headlight or any other lights, they are simply accessory lights, for cosmetic purposes, or to be used as a DRL.