Modification List (mods, part list)

Appearance Mods:

AVS Vent Shades

Blacked Out Tail Lights (VHT night shades)

Blind Spot Mirrors (generic, Auto Zone)

Carbon Fiber Door Pillars, Interior (hand wrapped)

Carbon Fiber 3rd Party Heated Driver’s Seat

Ceiling Interior Logo

Dartlene Front Wind Splitter, Side Skirts and Rear Diffuser

De-badged

Demon Eyes and Starry Night Halo Headlights

Dragon Eyes Headlight Tint with Carbon Fiber Eyelids

DRL LED Switchbacks

Eagle Eyes Black Headlights

Grill Installation with LEDs

HIDs (Xenon-Vision H11 bulbs)

Knight Rider LEDs & Strobe Lights (ebay)

LED Reverse / Backup Lights

Mud flaps (Rally Armor)

Orange Painted Calipers

Painted Engine Bay, Door Handles, HDP Logo on fuse cover

Plastic Dip door handles, front fascia

Rear Diffuser

Sirius LED White/Amber Fog Lights

Spoiler

Steering wheel HDP badge 

Third Brake Light HDP logo

Tow Hook – front & rear

Trunk Lettering

Underbody Multicolor LEDs

Vinyl Graphics – racing stripes, hash marks, company logo, record label logo

Wheel Pin-striping

Window Tint 35%/5%/5%


Electronics:

1/0 AWG Ground Wire (engine bay grounds)

10” Subwoofer & Custom Enclosure

Bullz Audio Distribution Block (2)

Hifonics HFXR 2 or 3 way Crossover (for Subwoofer)

Kicker 41KSC354 3.5″ 2-way Dash Speakers

Polk DB691 3-way 6X9″ Speakers (4)

Raizin Voltage Stabilizer & grounding kit

Remote Start

Schoche Line out convertor & Spinning Subwoofer grill

Unichip Q4 with custom tune(s) Syked ECU Custom Tune


Engine & Performance Mods:

Brisk Racing Spark Plugs

CDV Delete

Deyeme Rear Engine Mount

DRP Intercooler Pipes (hot & cold side)

Electronic Cutout Exhaust with Custom 2.5” Midpipe

Forge BOV

GFB DV+

HDG Performance Front Mount Intercooler (28″ X 7″ X 2.5”)

HPSI RAM Air intake System

James Dean Muffler 2.5″ Straight Stainless Steel Split Exhaust


Jegs Air/Oil Separator

K & N Apollo / Typhoon Ram Air / Cold Air Intake

Metal Shifter Link Clips

MPX Ported Throttle Body

Road Race Motorsports High-Flow Catted Downpipe & Lightweight Pulley


Interior Mods:

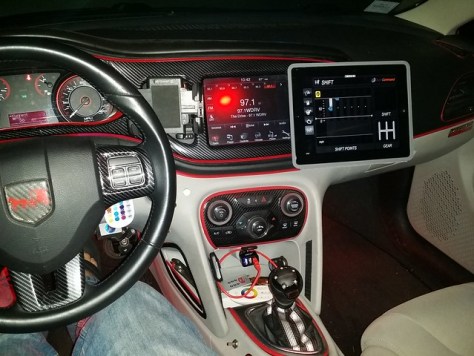
Halo ProSport Boost Gauge

Momo Shift Knob with Chameleon Accent

MPX Short Throw Shifter & Base Bushings

Multi-Color Floating Island Bezel

Orange Ice Scrapper

Pedal Kit (custom with clutch spacer)

Phone Mount

Pin-striping

Redline Leather Shift Boot

Ultra-Gauge

Under dash/seat LED lighting & Strobe


Wheels & Suspension:

Eibach Pro Line Lowering Springs

Progress Rear Sway Bar

Sickspeed Spiked Lugs with Conversion

TSW Bathurst Wheels in gunmetal black – 19 x 8

Tires 235/19/8 with custom lettering

Tow Hooks (2) – generic/eBay neo chrome

Tags:
Category:

Wiring Fix Unichip Harness

Not really a mod, more of a repair. Had to rewire my entire Unichip harness. Apparently it sat too close to the engine block and caused a short. What a total PITA to find and diagnose. Re-soldered and weather-proofed every connection, even soldered on a new mini ATX connector. I’m 100% back in action, all 5 tunes are loaded back onto the Unichip, and even flashed the firmware to the latest revision.

24 pin mini ATX connector for the Q+ and Q4:
[IMG]

Tags:
Category:

Boost Leak Confirmed

Note: On Saturday, July 30, 2016 I found the issue with my gas mileage. Sweet lord, what a relief! Driving up to a friend’s I got over 36 MPG, and it was b/c of multiple boost leaks. I had one leak on the intake, so we pulled it and added a sealant and re-tightened. The other side of that same line, near the oil separator had the rubber “L” piece ripping a bit, causing air and some oil to leak out. The biggest leak was between the downpipe and the turbo – whoa! We pulled the bottom loose, and removed the metal bracket that attached the factory DP to the exhaust. This allowed it to move up another few millimeters, making a tighter seal and fixing the leak.

The last leak was between the Forge BOV and the GFB DV+. Keep an eye on this one, as I had it installed properly, but we were still getting a tiny leak under high pressure. We added some high-temp silicone to seal this off, and used shorter bolts without washers, and tightened the crap out of it. Voila!

Also on the list, my two rear tires are total garbage. I got Delinte tires when I bought the wheels, and although they are all weather tires, they were total garbage. The front two blew already last year, which I replaced, and now the back two, each have a bulge in them that you can feel rolling along the highway. I ordered more tire stickers, and new tires.

Pic has nothing to do with this, it’s just an excuse to show off my demon eyes! Lol. (I’m getting the laminate replaced tomorrow)

Tags:
Category:

Electric Exhaust Cutout and Custom Midpipe / B-pipe

Exhaust cutout installed today!  This is an electric cutout, that dumps straight out of my down pipe, and then to a custom 2.5″ midpipe / B-pipe.  Switch is installed next to shifter.Name: ForumRunner_20160606_102413.png Views: 112 Size: 406.7 KB

I had a custom 2.5″ B-pipe created, and welded on a cutout, right after the downpipe. I installed the switch inside, near the shifter, but out of the way of the seat. Only takes a second to open and close – sounds awesome! It moves the power band up, so the turbo kicks in smoother, and screams up top. There is a little bit of low end torque lost, similar to those with a 3″ exhaust, but makes it up above that. I wish the pics were a bit better, but whatever. It exits out of the front hole / door in the underbody aero panel. It was open for over a full tank of gas, no issues. I was going to add a tip, but it’s too low.
20160606_104615
20160606_104625
20160606_104639
20160606_125032
20160530_135252

I cut this out for a tip, but never installed it. #lowlife  The above hole was later cut a bit larger, as I sometimes shoot flames!
20160627_215417
20160627_215434

This is how I soldered the switch. This switch is a momentary on/off/on switch. Forward is open, back is piped exhaust, tied to ignition switched power.
20160701_171351

I purchased the electric cutout kit from ebay, and it was about $85.  Here is something similar.  It is a basic 2.5″ cutout, that includes cutout, switch, wire, gaskets, y-pipe, clamp, dump, and hardware.  The midpipe is fine, running closed, for emissions in IL.  The high flow downpipe, however, was not, and has to be removed every two years to pass emissions.

Here is the final installation pic – It is the silver switch, to the left of the gear shifter:20161010_224301

No codes, or issues, however, if you run the cutout open for a long time, especially under WOT, you may get an error for rear O2, although it hardly comes on for me.  I ran her on the dunk, and open and closed was very close, although open gained 2-3 more whp.

Tags:

RRM / Custom Engine Cover

The thing that needs the most work aesthetically is under the hood – I should have done this before ROTM (ride of the month), but whatever. My buddy taking pics said he didn’t take much under the hood b/c it looked sh!tty. lol.

Latest update – I bought a used RRM engine cover for the car last week. I must be missing something, perhaps someone else with this cover can chime in, but it sure as Hell did not fit! @%#^$ I had to double check this is for the 1.4, which it is. The only pics that I can find are with the RRM intake, but three of the four holes provided don’t line up with squat! Whatever, I guess – I made it work.  I was told others had some issues with it rattling, so I wanted to take care of that, first thing. Perhaps mine was missing the hardware, I’d be surprised if they sell this thing for $300 without hardware, as without the intake, it just doesn’t line up.

Not a problem – first thing I did was remove the aluminum plate below the lettering. It was riveted on, so my guess this is where the rattle was coming from for the other user. I cut all four rivots off, and removed the plate. I did some sanding on the surface, and painted it with (of course) orange high temperature engine paint – same I had used for the fuse box cover, heat shields, etc. When I put it back together, I used nuts and bolts with lock washers, so this thing will never come loose, or rattle.

Then I measured the distance between my two engine cover mounting rods, which was 15.5.” I marked the inside and drilled another hole, same size as the other (useless) holes. Once I had it lined up, it looked fine over the engine. I didn’t like seeing the other holes, so I used some black allen head bolts and washers, and secured them from the back with nuts. Now the cover looks fully bolted on, like my car!

I took some metal tubing I had lying around, and cut two pieces approximately 1.5″ each. Then I sanded them down and removed any extra particles – these will be the spacers to hold the heat shield off of the engine. I had to find two longer bolts, as the stock bolts wouldn’t even reach! Fortunately, I had these lying around, too. Now it mounts just fine, clears the engine & hood, and comes on/off quickly, now with an 8mm socket, instead of everyone else’s 10 mm.

I still have to clean up the engine bay a bit. I also added switchback LED DRL’s and had issues with the resistors – no worky! Perhaps it’s due to the switchback fog lights I have, as when the resistor was in line, the side marker lights and DRL cut out. (This means there is too high of a load in the system.) I experimented with a few things, and found that another switchback led I had lying around worked perfectly! So I have one extra LED strip inside the engine bay, which will work great, as I already have other engine bay lighting installed, I just haven’t updated this build thread, yet. At first I wired the white and yellow together, which worked at first, but caused some weirdness with the turn signals. Instead of flashing straight yellow, it flickered in white once every few flashes. This told me there was still too much load, as the yellow is triggered by lower voltage. I cut the yellow power line, removing that load (cutting the load in half) which solved the problem 100%! I haven’t had a single bulb out message in over two weeks of daily driving.

Score one for the good guys!

Tags:
Categories: