Headlights V4, Rust Fix, Ignition Coils, Sequential Turn Signals, Shifter

Many things happened at once, as once the front end is apart, it makes sense to add everything at one time, especially if you have other transportation available. The weather has been nice, so my bicycle has been seeing some love during this transition.

First up, the 4H-Tech short-shifter kit, used under the hood connected to the transmission. It works great with the MPX STS and solid bushings – You wouldn’t believe how tight the shifts are – it’s like sex! Installation is pretty simple, but the difficult part is connecting the tiny metal pin clip to secure the new linkage. I recommend using a pair of long needle nosed pilers to hold and attach the clip. The website is visible in the picture below:Untitled

I wanted this design I made for my shifter – Cravenspeed.com will custom print the top portion of their knob, so I made this happen:Untitled UntitledUntitledUntitled

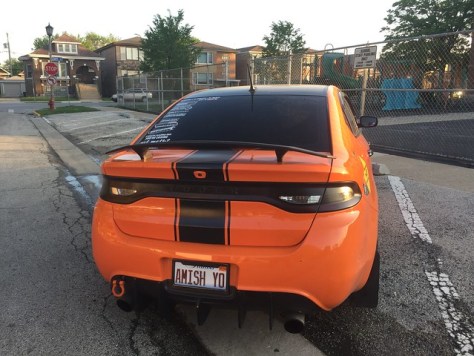
Plasti dipped the back portion of the my stripe – what used to be the Horse-Drawn Records logo, as well as the spoiler that was orange:UntitledUntitled

Upon removing the spoiler, I found the previous genius that installed the spoiler did nothing to seal the hole, or to prevent future rust. By hand, I sanded the tiny portions of rust buildup under the spoiler mounts down to bare metal. I used some rust inhibitor, then cleaned it again and added primer and new orange paint. Also sealed the trunk side, as well.UntitledUntitled UntitledUntitledUntitled

Also painted the rear tow hook orange, and the front one black: Untitled2018

Gloss black roof wrap, using Vvivid vinyl:Untitled

Anyone know where the oil dipstick is?Untitled2018

What’s for dinner? Headlights? Awesome, Dad!! 10 minutes at 220 degrees and BAM!2018201820182018

Color matched eyelids:201820182018

Chicagoland Darts in the house!! #trytokeepup 20182018201820182018201820182018UntitledUntitledUntitledUntitled

Headlights re-assembled:2018Untitled2018Untitled

Finally replaced the factory OEM ignition coils. *tip – If you are patient, you can find these Bosch coils overseas on ebay for $50 each, including shipping if you look around.UntitledUntitled

UntitledUntitled

Finally, painted black fascia pieces and orange trim, replaced the fog lights with sequential fog lights, brought through the front, then sealed with silicone:UntitledUntitledUntitled

Raw AF! UntitledUntitledUntitledHeadlights V4Headlights V4Headlights V4Untitled

Tags:

Headlights, Demon Eyes, Halo Headlights

Next Up: Headlights!!!! Woot Woot! Bake these bad boys for 10 minutes at 220˚ – Shazam! They open right up. Do not attempt with OEM Chrysler headlights, the adhesive is heat resistant and needs to be cut open.  Some aftermarket headlights may change the bulb socket, so be aware of that.  Mine are EagleEyes brand, and they now use an H8/H9/H11 bulb, instead of the Dart’s 9012 socket.
20150402_134325
20150605_082953
20150605_083002

OEM Silver Headlights:20150321_164658
20150405_201514

Painted the silver portion of the headlights gloss back, and also used the 2k Glamour Clear Coat. The pic also shows the demon eyes (partially) installed. I used a dremel to cut away enough of the headlight to fit the halo in, as I also used a diffuser, so you don’t see the naked LED strips.
20160706_004756
20160705_004624
20160709_094116
20160709_094127

I’ve got a lot of mods to do, if I want my build thread as long as @viperman96 … Lol. That being said, this project started as a simple repair. Last year, I installed my FMIC, and has been working great. A few weeks ago, I was taking a friend home after the Guns N’ Roses concert (BAD ASS, btw!) and on the way home, I heard a “pop.” I’m not sure what was up, but I was pretty sure something blew off. Sure enough, upon further inspection, my pipe blew off the driver’s side of the FMIC. DAMN!

I put her up on the Yoderian ramps, and had a look. I tried every form of yoga, stretching, contortion, and hypnosis, but I could not reach up into the area to fix it. At that point, I said screw it, and pulled the fascia off. I wasn’t ready to do the headlights, and other wiring I had been putting off, but at this point, I didn’t want to keep pulling it off. Once I got in there, I realized the hood latch bolts had come loose, and the FMIC fell forward just enough to pull it loose. I re-bolted it and used toothed lock-washers. That thing will never come out, again.

Here are some pics of the wire mess before I cleaned everything up. I went through an soldered, crimped and waterproofed every single connection. I also soldered on loop fasteners to all of the ground points. I even sanded down a few areas to make more solid ground connections. This proved to be totally worth it, as the cheap HIDs that used to flicker (just a tad) were now completely solid. Perhaps this is the only case of flawless, non-canbus lights, that I have seen, although it’s taken me a bit to finally get them perfect.

soldering the connections:20160706_004651

adding loop fasteners to the ground points:20160706_203116

Moved the (hot) resisters to below the intake and fascia, routed wires to the underbody lights:20160706_004708
20160706_004715

OMG – what a mess!20160706_004651

re-routed all of the wires under the fuse box (had to remove it):20160706_004738

added tie wraps (replaced them with black, later):IMG_20160708_170415

tie wraps (again, I could see the yellow through my grille, so I swapped them with black (doh!):20160706_203105

Almost back together:20160708_081451

Since I swapped out the battery for an Optima, it gave me the chance to put all of the auxiliary power on the side terminals, leaving only critical engine components on the top terminals. I may add a dry cell battery for car shows, as well.20160708_081506

After the front end was re-assembled, I put all of the control boxes along the passenger side under the hood. There is a ledge with plenty of space – All of the boxes got adhesive promotor and 3m adhesive. They are all RF controlled, and when the hood is open, I can read what mode / setting they are in, and adjust accordingly, if needed. This now includes the Starry Night Halos (https://www.starrynighthalos.com/ or Herculeds. The most powerful name in LED lighting.) Demon Eyes* and Yoderian Magical Underbody Lights.

[IMG] Angel Eyes, also known as “halos,” are accessory lights that are installed or integrated into a vehicle’s headlight assembly, to encircle the low or high beam headlight. They do not replace the headlight or any other lights, they are simply accessory lights, for cosmetic purposes, or to be used as a DRL.[/IMG]

These are the wires coming out of the headlights. All of the connections were waterproofed, as well, which I highly recommend. The Starry Night Halos DO NOT come with enough cable length to mount in a logical position, which was really annoying. I had to solder extensions on them.

20160708_200123

Here is the headlight assembled. You can see the halo diffuser in this pic with the lights off.
20160912_082714
20160812_211826
20160825_225642
IMG_20160824_235739

Here are all of the interior switches – the four colored switches are for interior and exterior lights.  The smaller, metal switches are Grille/Underbody Lights, SN Halos, and Demon Eyes, respectively.

20160701_171357
20160710_204820
20160710_212400
20160712_224843
20160715_200821
I would also like to point out to the next guy trying this – the Dragon Laminates (Dragon Eyes) baked in the oven @ 220˚ for 10 minutes with no issues, whatsoever.

*Angel Eyes, also known as “halos,” are accessory lights that are installed or integrated into a vehicle’s headlight assembly, to encircle the low or high beam headlight. They do not replace the headlight or any other lights, they are simply accessory lights, for cosmetic purposes, or to be used as a DRL.

Tags:

LED Lighting, Dream Color Underglow Lighting, Wheel well Lighting, Strobe Lights

Started out with blowing off one of my pipes connecting the FMIC – before I knew it, she looked like this, again:20160706_004651

Next installment, interior switches and wiring. I ran all of the needed wires through the firewall, both below the clutch, as well as on the passenger side, behind the glove box. I did the project in phases, as there is never much time in my life, nowadays. I pre-wired all of the switches in my shop, and measured out all of the cable runs, leaving the excess at the interior firewall. Most of the wires could be run by simply removing the lower footwell panels and below the steering column. Here are the pre-wired switches, and the holes already drilled out. Everything was trimmed and heat-shrinked prior to the installation in these pics:
20160701_171404
20160701_171357

The wiring is a bit more complicated than needed for most, but it is my specialty, and this is for car shows and hang-outs. The first four colored switches are simple on/off, controlling the strobe lights outside, the KITT LED lights, interior roof shadow lights, and the console and glove box lighting. The second set of switches are DPDT switches, or on-off-on. These are wired to two separate power sources. Up is on constant, with power straight from the battery. Middle position is off, and the lower position is on with an ignition switched fuse location. This enables the exterior LED lights, and the Halo headlights and demon eyes to come on with the car, but also enables them to run with the car off and locked.

Tags:

Dragon Eyes Headlights – Dragon Laminates

This is how you make your car wear sunglasses!  Dragon Eyes, by dragon laminates.  www.dragonlaminates.com  You can find this specific product here.

FYI – these are the “neo-silver” color on the website, and they say it affects the headlight output the least, and barely noticeable on light output.

“Will your films change the headlight output color?

In short yes, it varies and also depends on the customer’s selection. On some of our films, such as our NEO Silver Dragon Eyes, the amount of color change at a minimal and will shine mostly white.”

At first, I bought a cheap knock-off set from ebay, and installed them, myself.  I was never able to fully get the wrinkles out, and burnt my fingers trying – several times.  I don’t recommend this, unless you are very experienced, as the Dart headlights curve in two directions.

Final mods of the year – Dragon Eyes 2.1, both on the headlights and the reverse lights (you were right, SC – good idea!) as well as carbon fiber eyelids on the headlights.
Untitledfront splitter front dart
Untitled

The real-deal Dragon Eyes don’t color the headlights, or change the output at all. The knock-offs made the light too yellow for me.

Dragon Eyes Reverse Lights:

Tags:

HID Headlights

HID’s? GET IN THERE!

Bright as Hell! Single error at startup, but some flickering, then sometimes they wouldn’t fire. Winter seemed to be worse.

These were a generic, Chinese knock-off brand, likely purchased through Alibaba.com.  They said “Canbus Pro” on them, and the numbers never matched any cross referencing.  The Eagle Eyes headlights changed the bulb socket from 9012, to H8/H9/H1.  They ended up flickering, a bit.  I adjusted the grounds, but didn’t help.  The left ballast finally went out Jan 2017, so they were replaced with Xenon-Vision HID’s.

The Xenon-Vision HID’s are the real deal!

These are error free, and many have gotten great results, even in the extreme cold.

Once at the site, select Canbus 35W ballasts, and choose 9012.  The 55W will be too hot, and may cause issues.  These will work bright, and error-free.  On checkout, use the code “dodge-dart” for a $20.00 discount.  As of Jan 2017, mine were $80.00, shipped with the discount!  Here is the link.

These work very well, and are quite simple.  I got rid of the dedicated battery line and relay, and simply draws power from the stock headlights.  No additional resistors were needed, and the build quality is top notch – a very rugged looking product.

Mine were the wrong bulbs, at first, due to the Eagle Eyes.  They even sent me a replacement, and paid for the shipping!  I really recommend these guys!  Other great websites for HIDs are Diode Dynamics, Morimoto and Xenon Supply.

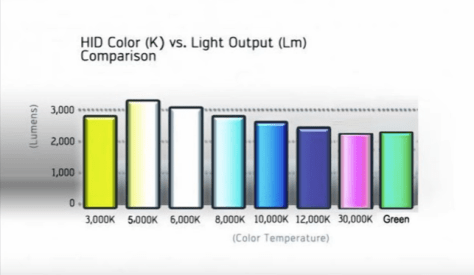
The best video I’ve seen, that explains HIDs and light temperature is here:

Here is a chart, cross referencing light color temperature and perceived lumens:


There is a great review on dodge-dart.org, by my friend, Matt “Cntrollerfanboy” here.  He goes into detail, and the product really is good.

Tags:

New Headlights (black) and LED switchback Foglight Strips

Next up was to knock out a few things, since I have to take apart the entire front end – with the Aero panels, it was a bit of a pain, especially with the car lowered. I replaced the silver headlights with Black Eagle Eyes (from Amazon or Ebay,) and wired LED fog lights that switch to turn signals (yellow) when activated. They run as the car is running via the fuse block, and switch to yellow turn signals as used. I also replaced the license plate holders.

*Note – The Eagle Eyes Headlights change the bulb socket from the standard 9012, to H8/H9/H11.  All three are the same, unless dealing with halogen bulbs – they are different wattages.

20150522_080316
20150815_231927

original silver light:20150405_201553
20150402_134325 20150403_082302


It was a bit of a pain, as you have to remove the entire fascia, including the front Aero paneling underneath. The whole assembly then lifts off of the car. You can find this info on youtube – search Dodge Dart Headlight replacement – you’ll fine a few.

The lights I used are from SiriusLed, but the link is no longer valid – May the force be with you! You can also find many of them on ebay.

There are three wires: one for the +12v white, one for +12v yellow, and a ground. Connect the white +12v line directly to the battery (fused) or find a switchable fuse and use one of those “add a fuse” parts from Amazon. The yellow power and ground were connected to the turn signal circuit. When power is sent to the turn signals, it switches to yellow, and flashes in sync with the turn signal. Be sure to leave enough slack in the cable after the splice so you will be able to change bulbs later, when they burn out.

I used a super strong epoxy to connect the LED to the strip next to the fog light. Mine didn’t have the factory fogs, so it was not hard. You need to drill a small 3/8″ hole on the inside of the strip so the light can peek through from the inside, where the wires are. I chose to leave the factory silver bezel/trim in place, and used the top side of it as a glueing surface

The adhesive bonds in 5 minutes, so you have to stand there like a jackass and hold it tightly in place, as it will want to slide off, or rise up off the trim. The LED can be trimmed as needed, and doesn’t affect the light, so I rounded/tapered one end so it sat flush with the trim. The other (wire) end can go back through the hole and be hidden, so it has a clean look to it.

Be sure to leave enough slack, so if the fascia has to be removed again, you won’t rip the wire connecting it to the headlights. It comes with a removable connector, so it can easily be detached. I’m guessing removing the whole thing will be a bit of a pain, but the led should last a few years, and it has been completely waterproof so far.

The problem is, it makes my headlights look yellow and sickly! I’ve got HID’s going in the headlights later this week.

You can add a switch if you like, but I didn’t. Mine run as soon as the car is running, so I never have to remember to turn them on. Keep in mind, that if you have the DRL on, then it turns on the yellow parking lights up front. When these are activated, it will then turn the fog lights yellow as well. So you can run dual amber upfront for DRL, or you can switch the DRL off and only run the fogs during the day. This is a preference found in the touchscreen.

You can tap into the turn signal wires directly out of the lights. If you peel away some tape, you can cut the wires, and then re-splice them back together with solder and/or electrical tape. I would use that ground as well, as the shortest path to ground is always best practice.
20150523_213356

Tags: