Category Archives: Graphics & Visual Mods

Ghost Flames on hood

When I bought the carbon fiber hood in 2016, it was in perfect condition from another Dart owner in Wisconsin. I drove the hood home and installed it, and one week later showed up to Midwest Chicago, only to find a large crack in the front of the hood.

I later added hood pins, but the damage was already done. I had it sanded and re-clear-coated, however, the damage went down into the carbon fiber fabric and couldn’t be fully eliminated.

I came up with an idea to cover the damage, and to make the car look a bit cooler, even though it is a pretty subtle modification. First of all, I did some research and looked up some flame patterns, and decided on a theme that I liked, and something that would work for my application.

I started with thin 1/8″ pin striping tape and laid out the pattern of the flames, being careful to cover all of the cracked areas. The tape peels up fairly easily to allow fixes and manipulation of the design.

Then I filled in the rest of the space with 1″ painters tape.

Time to spray the plastidip – I used 10 coats.

It did not peel perfectly, and did not look great until I touched it up. This was right after the tape was pulled off:

After everything was peeled, I used some Xylene and cotton swabs to carefully clean up the edges of the dip, where it started to stick to the tape. The xylene melts and re-activates the dip so you can fix peels, and smooth out edges. You can also “melt” down the corners and edges a bit to make it cleaner looking and stick better.

Final product: (in the rain)

Tags:

Headlights V4, Rust Fix, Ignition Coils, Sequential Turn Signals, Shifter

Many things happened at once, as once the front end is apart, it makes sense to add everything at one time, especially if you have other transportation available. The weather has been nice, so my bicycle has been seeing some love during this transition.

First up, the 4H-Tech short-shifter kit, used under the hood connected to the transmission. It works great with the MPX STS and solid bushings – You wouldn’t believe how tight the shifts are – it’s like sex! Installation is pretty simple, but the difficult part is connecting the tiny metal pin clip to secure the new linkage. I recommend using a pair of long needle nosed pilers to hold and attach the clip. The website is visible in the picture below:Untitled

I wanted this design I made for my shifter – Cravenspeed.com will custom print the top portion of their knob, so I made this happen:Untitled UntitledUntitledUntitled

Plasti dipped the back portion of the my stripe – what used to be the Horse-Drawn Records logo, as well as the spoiler that was orange:UntitledUntitled

Upon removing the spoiler, I found the previous genius that installed the spoiler did nothing to seal the hole, or to prevent future rust. By hand, I sanded the tiny portions of rust buildup under the spoiler mounts down to bare metal. I used some rust inhibitor, then cleaned it again and added primer and new orange paint. Also sealed the trunk side, as well.UntitledUntitled UntitledUntitledUntitled

Also painted the rear tow hook orange, and the front one black: Untitled2018

Gloss black roof wrap, using Vvivid vinyl:Untitled

Anyone know where the oil dipstick is?Untitled2018

What’s for dinner? Headlights? Awesome, Dad!! 10 minutes at 220 degrees and BAM!2018201820182018

Color matched eyelids:201820182018

Chicagoland Darts in the house!! #trytokeepup 20182018201820182018201820182018UntitledUntitledUntitledUntitled

Headlights re-assembled:2018Untitled2018Untitled

Finally replaced the factory OEM ignition coils. *tip – If you are patient, you can find these Bosch coils overseas on ebay for $50 each, including shipping if you look around.UntitledUntitled

UntitledUntitled

Finally, painted black fascia pieces and orange trim, replaced the fog lights with sequential fog lights, brought through the front, then sealed with silicone:UntitledUntitledUntitled

Raw AF! UntitledUntitledUntitledHeadlights V4Headlights V4Headlights V4Untitled

Tags:

Hood Pins Installed (on carbon fiber hood)

Hood Pins Installed – A local car tech suggested to keep my new carbon fiber hood looking good for years to come, I should secure it with hood pins. This will keep it from cracking over time, and a safety net from the hood latch separating from the carbon and snapping up during extreme driving. Less than a week later, the clearcoat on the CF started to get a crack near the hood latch. I immediately ordered hood pins, including gaskets, so no metal would be touching the carb fiber. The hood needs to be re-clear coated in 1-2 years, so no biggie, but I wanted to ensure it stays this way.

Tags:

Rear Diffuser How-to

Final segment of the custom ground effects kit – the rear diffuser fins. This works with the existing OEM part, and mine has the dual exhaust, but it really doesn’t matter. First thing I did was figure out a plan, and create a template out of cardboard. It took several tries to match the curve of the car. Any spaces and there is less for the adhesive to stick, plus it wouldn’t look right – it took me about 4 revisions before I was happy with it.

[/url]

Once I had it right, I found a very cheap source for inexpensive ABS plastic – I traced these out and was able to fit 4+ on a sheet, and I only needed / wanted 4

I sanded them down, used adhesive promoter, then plastic primer, then finally the black paint:

I painted these black, as well. They were used on the bottom to secure them in. On the top, holes were pre-drilled and then screwed into the plastic diffuser.[/url]

Finished product:

Tags:

DIY – Side Splitters – Alternative to Mopar Side Skirts – Side Diffuser How-to Install

I bought a universal side lip a few months back – it doesn’t really fit the Dart, but I made it work. It had the side wing on it already, so it trumped my idea to match the front splitter wings, as shown in my DIY aggressive front splitter wiki article. I had a hard time getting a hold of it, as it was backordered, and I ended up waiting months for it. It came with some mounting hardware, but didn’t quite work, out of the box and a plug-and-play. First step was to mock it up to the car, and figure out a plan.


My first hurdle was fitting to the front Mopar mud flaps. The angle of the flaps made it difficult to match this up. I tried a few things, but ended up trading the mudflaps for the Rally Armor ones, made for the dart. It fit the aggressive style a bit better. I ended up somewhat selling the Mopar mudflaps.

Here are the (flatter) Rally Armor front mud flaps:

After I pulled off the EZ Lip, I found there were multiple plugged holes under the body. I found plastic inserts to catch a screw and attach to the holes. Found them on ebay, they clicked in, then pre-drilled the holes to line them up. This was easy b/c they were much wider, so it had some play.


I could click them in and rotate 90 degrees to lock them in:

I had to drill the holes, and then cut out a small square from the splitter, in order for it to sit flush with the side of the ride:
Then I applied adhesive promotor (after thoroughly cleaning the surface with acetone) and applied the double-sided adhesive:[

(I later figured out, it was quicker and easier to use self tapping screws, through the holes on the metal mounting bracket. This eliminates the need for extra holes in the product.)

Once I had the positioning perfect, I marked my cuts to angle the front of the lip. IMO, it was the only solid way to link the two together cosmetically. Any other way I tried, looked sloppy. This follows the lines of the car better, and solves the issue of matching the seams on a curved edge.

I did this project on a 90 degree day, and I realized these may sag a little bit. They wouldn’t come loose, but I wanted to make sure they were completely rigid. I took 2 long metal brackets, used for shelf supports, and fitted it underneath the lip. I used self-tapping screws to secure the metal support, as well as the fastened side splitters. I can say, the car has been well over 100 MPH several times since the installation, as well as several hundred highway miles without an issue.

Finally, I used this carbon fiber-looking trim for underneath the front diffuser. I tried it on the sides originally, but it looked so good on the front.

Here, you can see the front and side splitters, as well as how the Rally Armor mudflaps look. I’m lowered, and I may raise the rear mudflaps, just a bit.

Tags:

Painted Door Handles and Rear Diffuser Fins

Plasti dip is not a mod!! So… I ripped all of the plasti dip off of my black door handles, and pulled them off the car again. This time, I rough sanded them down, then applied a few coats of adhesive primer, followed by two coats of primer, and then finally, several coats of black, high-gloss paint. The paint is specifically designed for plastic and automotive use. This is the final coat, drying in my backyard.

20160702_175251v

Here are the handles, lock, and rear diffuser fins after the final clear coat. I used industrial strength, professional clear coat, called 2k Clear Glamour. Keep in mind, this stuff is so powerful, it has to be opened and used within 48 hours, or the clear coat will harden in the can. Just to be safe, I allowed the paint to cure for 3 days (72 hours) and then let the clear coat cure for another 3 days before re-installing them on the car. My wife doesn’t usually make comments about my craziness (car mods) but even she said they looked amazing back on the car. I’d have to agree – well worth the wait!!

20160706_004559

20160706_004614
20160822_224434Here is where I got the clear coat – a bit pricey, but worth it!

Clear Coat Link

Tags:

How to Build and Install a Custom Front Wind Splitter / Front Lip / Diffuser / Chin Spoiler

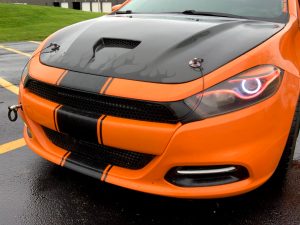
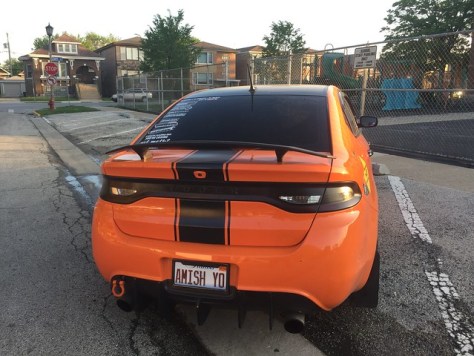
Custom DIY Front Splitter / Chin Spoiler / Front Lip / Ground Effects
IMG_20160428_003030The Mopar lip kit is fine for most people, in fact, it looks quite nice. The problem I had is the cost, and the fact that everyone has that one option. I have done a ton of research on splitters, lips, spoilers, etc., but I am in no way a car, or racing expert. Use my instructions as a guide – then put your own flavor on it. Not everyone will like this style, but you can see what I struggled with, and why I made the decisions I did. I hope you like it, but if you don’t, you can build yours any way you want.Before you ask, a front splitter is designed to produce extra downforce at high speeds to the front wheels for better handling and traction. These are often used in conjunction with rear spoilers in race cars, and won’t have much of an impact on driving below 80 MPH. They usually fill the bottom portion of the car from just ahead of the front wheels to a few inches beyond the front of the car. Oh, and they also look freakin’ baddass!Typically, a front splitter should fill in the entire space in front of the wheels, and should not have any spaces or openings. My Dart has the Aero package, which means it is already covered under the entire bottom. It also means the aero panels protrude down past the fascia. If you put a flat piece of material under the whole thing, it can’t touch the sides b/c the oil drain area sticks down too far. A splitter should also be flat if possible, so I omitted the center area in the splitter, and left it as is. This also reduced the weight of my entire splitter to less than 3 lbs.Now the question everyone asks (go ahead): What’s it made out of? Alumalite. “Alumalite is a strong, aluminum composite panel made of with a high density corrugated polyallomer (CPA) core that will not swell, corrode, rot, wick water, or delaminate even under prolonged water exposure. Factory-baked polyester painted aluminum faces add high gloss brilliance and rigidity.”There are many ways to do this, and the cheapest would be plywood, and then covered in polyurethane resin to make it waterproof. The problem with this is weight. ABS plastic is also pretty expensive, and also heavy. I looked up what the professional racers use, and most of them are using some form of alumalite. It is incredibly strong and lightweight. It can also be bent, if needed, and is completely waterproof. The best way to describe it is two, thin aluminum sheets, separated by a corrugated material.
20160310_143825So then I researched, “Who else would use Alumalite,” and I found they use it to make signs! I reached out to some local sign companies and confirmed this. All you have to do is ask them for scraps. I needed something that was at least 72” x 26” – I ended up finding a piece for the price of a 12-Pack of Anti-Hero IPA (although he is my buddy, and did the graphics for Dartlene Orangina)
20160308_201807
20160310_194925
20160310_194934The first thing I needed was a template, and a way to line things up. The easiest way to do this was to start with the Mopar Front lip. When tracing the lip, you have to be careful, and take into account the 7/8″ rise in the middle of the fascia. If you press the lip flat and trace it, along with the holes, once you hold your trace up to the car, you will find the outer edges and holes are too wide. Be careful to trace the piece while keeping it’s shape, holding the edges up.
20160315_011531
20160313_171527
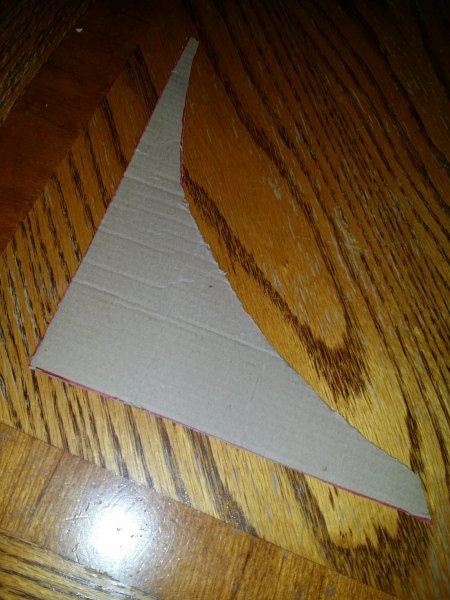
I followed the front angles of the car, but I wanted a little more aggressive appearance. I also knew that I wanted to wrap the thing in carbon fiber, and if you’ve done any wrapping, you’ll know how difficult it is to wrap around a curved edge. If you want to try this method, you’d have to cut along the top edge, and use a separate piece for the front / bottom. I used cardboard to create my original template, so I could mess with it, as well as hold it up to the car for rough placement. I was concerned the cardboard would bend, but the final material would not, so I also had to keep in mind the upward arch in the middle if it is attached flush to the fascia.
20160417_134220
20160417_134231
20160417_134353Now that I had my template, I dry fitted it to the car to make sure. Then I traced it onto the alumalite, and cut the front shape and the inner circle, leaving a bit extra on the inside, which could be trimmed. As it was, I had to adjust the holes a little bit after the final cut, as I was using the same holes to secure the aero panel and the Mopar front lip, if you had one. The 4 screws in the rear connected perfectly to the cut splitter, but it had to bend up too much in the middle to work, so I needed spacers. I took some brass tubing I had lying around, and cut it into (4) 7/8” pieces. Then I sanded and painted them black. Washers were used above and below the splitter and spacers, and I found some wood screws that matched the thread of those metal clips in the aero panels. Lock washers were put on the very bottom to secure it.This is without the spacers:
20160417_144829
20160417_144836
20160417_144841
20160417_144948
20160417_144958
20160417_170311

Spacers:
20160424_190539
20160424_190543

Underneath the spacers:
20160424_190552
20160424_190556

Then I wrapped the splitter, easily terminating the ends of the wrap on the bottom, as no one can see that, unless the car is on a lift. For extra credit, I guess you could wrap or paint the bottom, too.
20160423_005240
20160423_005248

Rough mockup:
FB_IMG_1461423321194

After I had the flat shape, I added my side fins, using simple nut and bolt connections on either side. I lined up the outside to the shape of the car, and the back to the wheel well. I originally was going to bend the alumalite into the fins, but I wanted something that looked a little better and wasn’t as thick. The edge of alumalite looks a like cardboard, so it needs to be covered, wrapped, or filled in. I found some thin aluminum and could easily cut and bend it as needed. Then I simply drilled a couple of holes in the new “L” shaped wings, and bolted from underneath. Shazam!
20160423_102432
20160423_102438

I mounted the splitter using the 8 holes in the bottom fascia that connects the aero panel. The rear 4 were factory screws, into the factory holes, and the front 8 were factory holes, with longer, wood screws that matched the thread size. I later painted the silver bolts black, as well.

Finally, the last step was the rods. I already had replaced the grilles with mesh that had medium sized holes. I painted a couple washers black, and used them in front and behind the grille to secure it, and then bolted it to the splitter. I was able to do all of this without removing the fascia, but it was a bit tricky squeezing in and securing the nut on the backside. They are adjustable, so you can make them ultra-secure. I’m not saying you should stand on this thing, but it is very secure, and has lasted, so far!
20160425_075743
20160425_075757
20160424_203318
20160424_222720
20160425_075821

I later added a lip underneath the splitter, to give it a more “lowered” look – I think it makes it more aggressive, but certainly works without it:
FB_IMG_1464560314497
20160621_203048

Tags:

StreetGlo Pinstriping / Glow in the Dark

Latest mod: upgraded the wheel pinstriping to streetglo pinstripes. The front has the upgrade, and the back is regular 3m pinstripes (yawn.)

Before:20160531_210553

streetglo.net
Name: ForumRunner_20160524_010353.png Views: 141 Size: 418.2 KB

Added some more “invisible” striping – invisible by day, glows under lights) – only on front tire:20160524_004645
20160531_220544

Experimenting:20160531_211854
20160602_215401
20160601_002328
20160602_213645

Tags:

Front Wind Splitter

New Yoderian Front Wind Splitter / Chin Soiler / Front Lip √ No protective lip, yet, in these pics:

This includes support rods, wings, and carbon fiber wrap.

20160425_075743
20160425_075757
20160425_075821
20160425_075828
20160425_075845
20160425_075904
20160425_075932

I later adjusted the splitter, dropping the nose a little bit, making it perfectly flat:
instagram

Tags:

Tow Hooks

Got a couple of tow hooks for 3 reasons:

1. Easily pull up on to a tow truck in a pinch and not scrape up my wheels & underbody.
2. Protect my front and rear bumper from idiots running into me while parallel parking – instead their car will hit my tow hooks.
3. Look pretty cool and match my dragon eyes (headlights)

Tow hooks installed:

Tags: