Dartlene Rear Diffuser

Dartlene Rear DiffuserThis is a rear diffuser version that is also a bit more aggressive, much like the front and sides.  It is extremely lightweight, and attaches directly to the rear fascia.  This product will likely not work with the Mopar rear diffuser, but will work with dual exhaust and no exhaust cutout setups.

There is a new version of the diffuser, Diffuser Plus, and each fin is twice the width of the original, or 12mm wide.  This is two sheets of Alumalite, bonded together.  The screw holes will be to one side of each fin.

The fins are made of alumalite, are extremely durable, and attach to the back with mounting tape and screws.  There is a hinge underneath to attach upwards to the existing undercarriage, and also screws into the fascia.  *You will have to make holes in your fascia!

Drilling is not needed, the kit includes self tapping screws, and the fins are pre-drilled, so a simple screwdriver will be all that is needed for installation. The diffuser fins are made from 6 mm, gloss black alumalite.  Double sided tape & screws will be included for mounting.  This kit has been on Dartlene since 2015 without incident.

For a more professional installation, we recommend removing the adhesive, and applying a thin bead of black silicone.  You can use dish soap and water to clean the overage, and this will dry incredibly solid on the car!

The standard version is 6mm thick, while the plus diffuser fins are 12mm thick.  The screws do show, or you can use a small amount of liquid electrical tape (black) to cover the screws, as shown in these pics.  The mounting hinge can be seen underneath:Untitled
Untitled

These are made to order, and require painting, so delivery will be about a week out.  These are all made by hand, and are available to order today, for $159.00, and the Diffuser Plus version is $219.00. Shipping is ~$10 to most of the US.

This includes 4 (or 5) fins, mounting screws and hinge, as well as double-sided tape for added strength.  Black silicone is recommended (instead of the adhesive) for a more professional installation.

New in 2018, we now offer a 5th fin!  The fifth fin goes underneath the license plate, so it is a bit shorter.  This is an additional $45 for the Diffuser, and $65 for the Diffuser Plus version, pictured below:UntitledUntitled

*Installation Instructions can be found here.

Some more pics of the original diffuser:UntitledRear Diffuser
UntitledRear diffuser standard version

Tags:

Rear Diffuser How-to

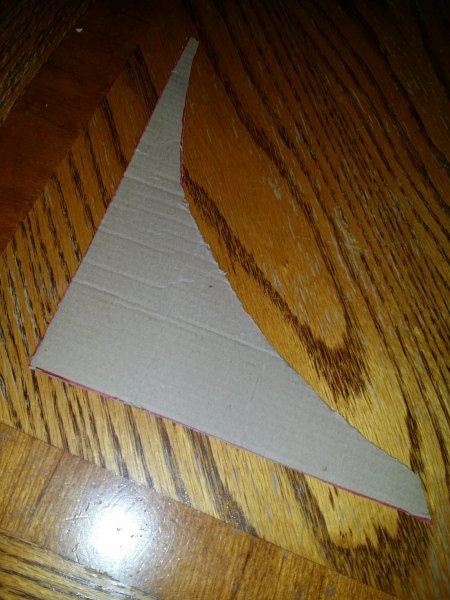
Final segment of the custom ground effects kit – the rear diffuser fins. This works with the existing OEM part, and mine has the dual exhaust, but it really doesn’t matter. First thing I did was figure out a plan, and create a template out of cardboard. It took several tries to match the curve of the car. Any spaces and there is less for the adhesive to stick, plus it wouldn’t look right – it took me about 4 revisions before I was happy with it.

[/url]

Once I had it right, I found a very cheap source for inexpensive ABS plastic – I traced these out and was able to fit 4+ on a sheet, and I only needed / wanted 4

I sanded them down, used adhesive promoter, then plastic primer, then finally the black paint:

I painted these black, as well. They were used on the bottom to secure them in. On the top, holes were pre-drilled and then screwed into the plastic diffuser.[/url]

Finished product:

Tags:

DIY – Side Splitters – Alternative to Mopar Side Skirts – Side Diffuser How-to Install

I bought a universal side lip a few months back – it doesn’t really fit the Dart, but I made it work. It had the side wing on it already, so it trumped my idea to match the front splitter wings, as shown in my DIY aggressive front splitter wiki article. I had a hard time getting a hold of it, as it was backordered, and I ended up waiting months for it. It came with some mounting hardware, but didn’t quite work, out of the box and a plug-and-play. First step was to mock it up to the car, and figure out a plan.


My first hurdle was fitting to the front Mopar mud flaps. The angle of the flaps made it difficult to match this up. I tried a few things, but ended up trading the mudflaps for the Rally Armor ones, made for the dart. It fit the aggressive style a bit better. I ended up somewhat selling the Mopar mudflaps.

Here are the (flatter) Rally Armor front mud flaps:

After I pulled off the EZ Lip, I found there were multiple plugged holes under the body. I found plastic inserts to catch a screw and attach to the holes. Found them on ebay, they clicked in, then pre-drilled the holes to line them up. This was easy b/c they were much wider, so it had some play.


I could click them in and rotate 90 degrees to lock them in:

I had to drill the holes, and then cut out a small square from the splitter, in order for it to sit flush with the side of the ride:
Then I applied adhesive promotor (after thoroughly cleaning the surface with acetone) and applied the double-sided adhesive:[

(I later figured out, it was quicker and easier to use self tapping screws, through the holes on the metal mounting bracket. This eliminates the need for extra holes in the product.)

Once I had the positioning perfect, I marked my cuts to angle the front of the lip. IMO, it was the only solid way to link the two together cosmetically. Any other way I tried, looked sloppy. This follows the lines of the car better, and solves the issue of matching the seams on a curved edge.

I did this project on a 90 degree day, and I realized these may sag a little bit. They wouldn’t come loose, but I wanted to make sure they were completely rigid. I took 2 long metal brackets, used for shelf supports, and fitted it underneath the lip. I used self-tapping screws to secure the metal support, as well as the fastened side splitters. I can say, the car has been well over 100 MPH several times since the installation, as well as several hundred highway miles without an issue.

Finally, I used this carbon fiber-looking trim for underneath the front diffuser. I tried it on the sides originally, but it looked so good on the front.

Here, you can see the front and side splitters, as well as how the Rally Armor mudflaps look. I’m lowered, and I may raise the rear mudflaps, just a bit.

Tags:

Front Wind Splitter

New Yoderian Front Wind Splitter / Chin Soiler / Front Lip √ No protective lip, yet, in these pics:

This includes support rods, wings, and carbon fiber wrap.

20160425_075743
20160425_075757
20160425_075821
20160425_075828
20160425_075845
20160425_075904
20160425_075932

I later adjusted the splitter, dropping the nose a little bit, making it perfectly flat:
instagram

Tags: